Bought a new iPad and using it as your go-to device? Chances are you’ve wanted to capture what’s on your screen at some point. Whether your iPad has a home button or not, there are various methods to snap a screenshot. For those with an Apple Pencil, you have an added advantage. Let’s delve into the various techniques to take a screenshot on your iPad.
1. For iPads without a Home Button:
Newer models, like the recent iPad mini, have ditched the home button. To capture a screenshot:
- Press the power button in combination with either volume button simultaneously.
- Your screen will briefly flash, and you’ll see a screenshot preview at the bottom left.
- To edit, tap the preview. Otherwise, your screenshot will be saved in the Photos app.
2. For iPads with a Home Button:
For those with older models that feature a home button:
- Simultaneously press the power and home buttons.
- You’ll notice a screenshot, indicating the screenshot has been taken. Find your screenshot in the Photos app.
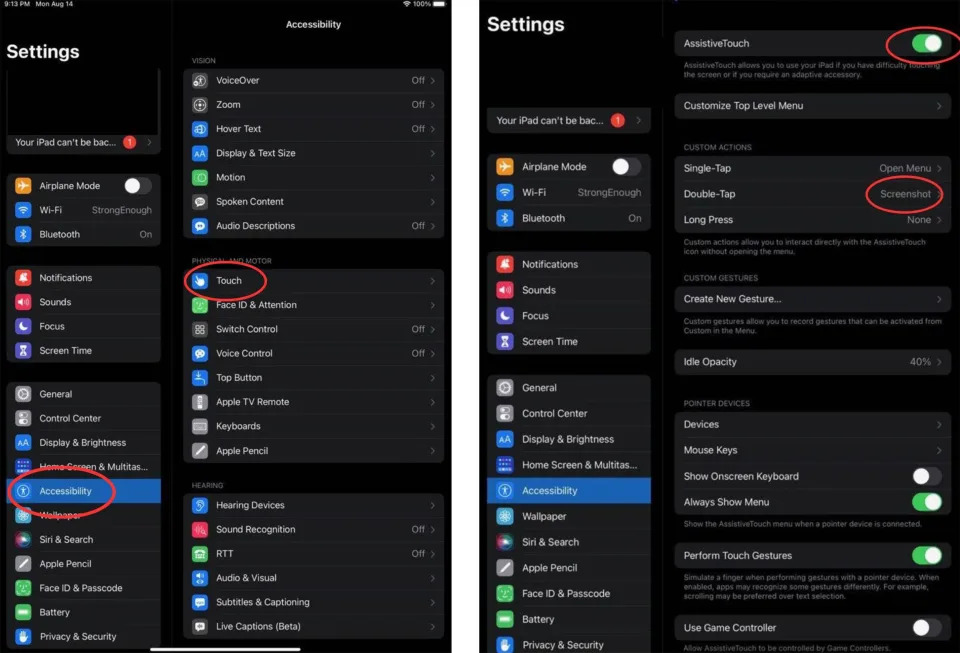
3. Using AssistiveTouch for Screenshots:
Want to skip the buttons? Here’s a button-free method:
- Navigate to Settings > Accessibility > Touch.
- Activate Assistive Touch.
- Set the ‘Double Tap’ function to ‘Screenshot’.
- An on-screen virtual home button will appear. Simply double-tap it for a screenshot.
Now, with these methods in hand, capturing moments on your iPad becomes a breeze!

Bonus Tip for Apple Pencil Owners
For those who own an Apple Pencil, there’s an added shortcut to not only capture a screenshot but also instantly edit it:
- Simply swipe up from the bottom left corner of your iPad screen using your Apple Pencil.
- An intuitive editing interface will pop up.
- Utilize the various brush options to annotate, mark up, or doodle on your screenshot.
- Once done with your edits, tap ‘Done’ and choose ‘Save’ to store your edited screenshot.
This feature enhances the iPad’s productivity, making it a handy tool for quick annotations and notes on screenshots.


